I want to tell you about this keyboard, I’ve been using the XTRFY K40 TKL RGB for 2 years now, it has been my go-to ever since it launched in 2019. Naturally after all that time there is some gunk accumulation. Nothing has been spilled over, it is just particles, but it got gunky on the keycaps and on the actual frame, there is also a bunch of crap underneath the keycaps.
I’m not a keyboard cleaning master, but we are going to use some common sense and some commonly available tools. You could buy keyboard cleaning kits on Amazon, but there is like a 1000 variations of them and most are not are actually good.
The Candidate
I have done a few deep cleans with other keyboards in the past, but this one is different because this is the Hardware Canucks Edition XTRFY K40. And also the keycaps are not the floating style, which means that getting access to the area around the switches is a bit more difficult, but I hope we can remove the top element of the frame to give us access to all the nasty gunk.
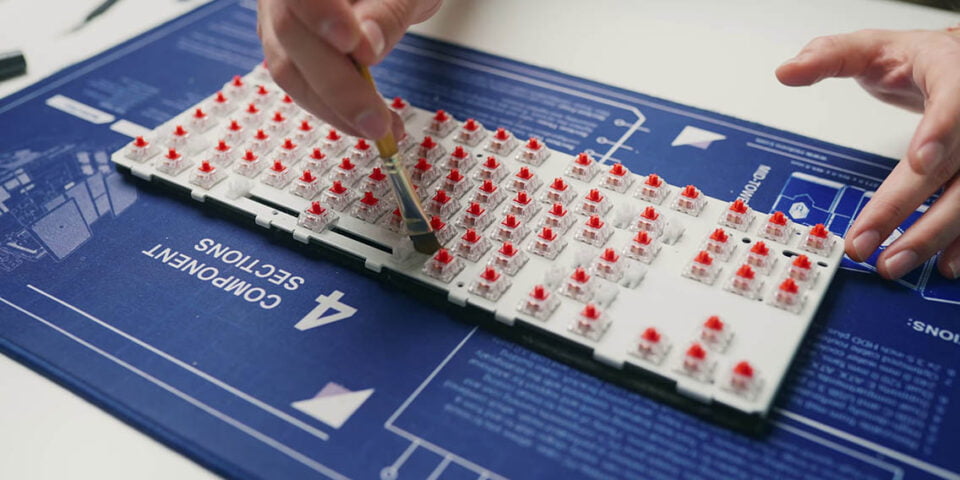
When it comes to the tools you don’t need a lot. You can use toothpicks, Q-tips, toothbrushes, or maybe even paint brushes, which is what I will be using to remove the gunk around the switches. A keycap puller is of course appreciated. If you have tweezers it is awesome to get access to those hairs. I have a mix of rubbing alcohol and water, and some soapy water for all my keycaps. The first thing I’m going to do is turn the keyboard around and tap it a little bit so that whatever gunk has accumulated around the switches and around the keycaps can fall out.
Disassembly
The next step is removing my top plate, something that is possible on this particular keyboard, your keyboard might not have this or might not have the top plate altogether with the floating style keycaps, which would make the next process much easier. With my keywords in particular having no top plate gives me better access to the very edges of the keyboard for better cleaning. This allows me to clean this portion separately and also will make it much, much easier to actually remove the keycaps. Now before removing the keycaps you can take a photo of it so you can reassemble the keycaps back in place easier. You can also find this product online, open it up on your monitor, and have a much larger image of where each keycap goes which is what I’m going to do.
Taking Off The Keys
And it’s time to remove all the keycaps. Because I removed the top plate removing the actual keycaps that are on the edges is much easier. We also have a keycap puller so this is going to be just a much faster job. You have got to be careful removing the larger keys because of the stabilizer, I like to kind of pull on one side and then pull on the other.
The next thing is for our keycaps to take a nice soapy bath. Not only will this get rid of any gunk that is underneath the keycap near the stem, but also help to dissolve any of that grease and gunk that has accumulated over time on the actual surface. Now I did say that I’m pretty impressed with how clean it is, but at closer inspection it is actually quite nasty, not just the large hair particles, but if you go really close with the macro lens you can see just a gunk accumulation.
Opening It Up
After removing a few screws the top plate of this keyboard comes off easily. Surprisingly there was even stuff inside the black frame. And now I know why this keyboard sounds so good, because of this dampening foam that fills in the otherwise hollow base. I will remove the cable just so that it’s not in my way.
Brushing & Cleaning

For this next part I’m using a paint brush, you can use a toothbrush or something with hard bristles to remove any of the large particles like hairs and stuff. I’m really surprised at how like dispersion of these large particles is very specific to around the spacebar, around the Enter, and there is so much gunk around from my left Shift. You will want to use something hard that doesn’t absorb liquid because as I go over with the paint brush I can feel that it is very grimy already and that’s not a good thing.
It’s interesting the stuff that comes out of the stabilizers. Because they are also lubed there is a bunch of hair that’s also lubed now… which is just great. Now that all the large and visible hairs have been removed from the base, it’s time to use a cotton swap to go around the really nasty areas and just like try and scrub off the grim. It is really important to make some rubbing alcohol in the water, because otherwise if you were just using water this gunk would not come off as easy it would just spread around a bit.
This was a bit more difficult than I expected to be honest, just because I didn’t expect the grime to be so sticky. It’s not just a matter of coming in with a cotton swab and wiping it off. You really physically have to scrub it off and then come in again with something else with a new cotton swab to remove the gunk that way. The good thing is it was fairly concentrated on the spacebar around the left Shift and around the right Enter as well. Even the WASD area was fairly clean and everything else outside of it is pretty much brand new. Now it’s time to wash the keycaps and reassemble the keyboard. I made the mistake of using the paint brush before removing all the grime with the cotton swab, so the grime got absorbed into the paintbrush and now it’s kind of nasty and very sticky I had to wash it with soap and even after that it’s not back to normal.
Washing The Keys
Now it’s time to work on our keycaps, they have been soaking in the soapy water for about an hour and what I like to do is take them out one by one and dry them on a kitchen towel. One thing to keep in mind is there is going to be a lot of water inside the keycap itself so you got to tap them to remove some of that water and place them face them up so that portion can dry. You should also replace this water a couple of times before actually drying the keycap, just to remove any of the soap and any residue that has accumulated in the water itself. I am going one by one, just so I can clean all five sides of the keycap, not just the top surface, but whatever gunk has accumulated on the side of the keycap.
Once they are all dry and on the keyboard I will give them one last polish, but that’s pretty much it. I’m very happy with the the keyboard base and all the gunk has been removed around the switches around the stabilizers. As mentioned before the stabilizers are lubed so there was a lot of stuff accumulated around the lube. Abd you have to be careful not to take the lube out or not remove too much of it, but if you have your own you can always replenish the lube on the stabilizers yourself.
Finishing Touches
Now our base is clean, our keycaps are dry, and my gosh the feeling of the base plate around the switches is so different now. It’s no longer sticky and grimy, it’s smooth, and the difference is noticeable because this is a white base plate so all the gunk was very visible. Next I reconnected the cable, and before I put the top light back on, I want to do one last sweep for anything that has accumulated and that I didn’t fully pick up. Notice that I’m brushing up or down, I’m not trying to brush within the keyboard because that doesn’t get rid of the particles away from the actual board. With this one last sweep, it looks brand new basically and it’s time to do the keycaps.
Reassembly
This is my least favorite part. I do have the image of the keyboard open on my monitor so I can refer to that for layout, but normally what I like to do is start with like the F keys, the larger Control/Enter/Shift keys that I know the location of, and then move on to filling in the rest.
The last thing I’m doing is giving each key a little polish just to remove any residue that I have put on it while handling the keycaps. After that it really does look brand new, well done me. Now this wasn’t too hard on this keyboard because the top plate is removable to give me better access to all the gunk and stuff around the switches, but if you have a floating style keyboard it’s even easier. The main thing to keep in mind when you’re cleaning around the switches is to make sure that the tools you’re using don’t leave any residue. The little bristles on my brushes they did fall off a couple of times, that’s why I had to do one last cleaning before I put everything together. Also don’t use too much liquid because that could damage the PCB inside the keyboard. Careful not to use too much alcohol, especially with ABS keycaps, because it will rub off some of that coating.
For keyboards that do disassemble I would recommend it to make your job easier. Of course, keeping in mind how to assemble the keyboard back together. For example, here it’s good that you don’t need to remove any of the rubber feet to access the screws. All four screws are easily accessible, but for some keyboards you would need to remove a rubber foot underneath where you find the screw. This was a very simple procedure, I’m not this assembling any of the switches to remove some gunk there, I’m not removing all the lube from the stabilizers, and thankfully there is still plenty of it even after me carving some of that out stuff so that I could remove some of that residue.
Conclusion


Overall, I’m very happy how this turned out. This is basically in a brand new condition just as I got it 2 years ago. If you have any keyboard cleaning experience, let me know in the comments, and if you have ever had to clean switches how did you do it? Thanks for reading and clean your keyboards responsibly.